「サーバーレスアーキテクチャの設計が複雑すぎて、どこから手をつければいいかわからない」——AWS LambdaやStep Functionsを使った開発で、こう感じたことはありませんか。
結論から言えば、OpenAI Codex CLIを活用することでサーバーレスアーキテクチャの設計からLambda関数の実装、IaC化まで大幅に効率化できます。本記事では、実際のユースケースに沿った具体的なプロンプト例と実装パターンを解説します。
この記事を3秒でまとめると
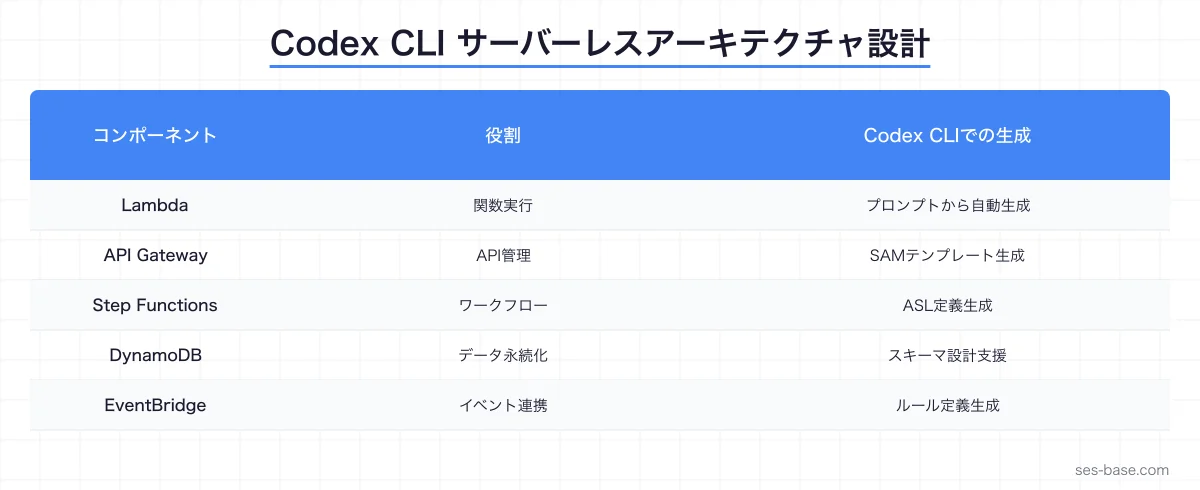
- Codex CLIはLambda関数・API Gateway・Step Functionsの構成を自然言語から生成できる
- SAM/CDKテンプレートの自動生成でIaC化をスピードアップ
- イベントドリブン設計のパターン選定から実装まで一貫して支援可能
サーバーレスアーキテクチャとCodex CLIの相性が良い理由
サーバーレスアーキテクチャは、個々のコンポーネントが小さく独立しているため、AIコーディングツールとの親和性が高い設計パターンです。Lambda関数は1関数あたり数十〜数百行で完結することが多く、Codex CLIの得意な「明確なインプット/アウトプットを持つ関数の生成」と完璧にマッチします。
Codex CLIがサーバーレス開発で強い3つの理由
- 関数単位の生成に最適化: Lambda関数のような小さなコード単位は、プロンプトでの指示が明確になりやすい
- IaCテンプレートの自動生成: SAM・CDK・Terraformなど、インフラ定義コードの生成に強い
- イベントスキーマの理解: S3イベント、SQSメッセージ、API Gatewayリクエストなどの構造を正確に把握している
SES案件でサーバーレスが増えている背景
SES市場でもサーバーレスアーキテクチャを採用する案件が急増しています。
| 案件タイプ | 技術スタック | 単価相場(月額) |
|---|---|---|
| API開発 | Lambda + API Gateway + DynamoDB | 70〜90万円 |
| バッチ処理 | Lambda + Step Functions + S3 | 65〜85万円 |
| イベント駆動 | Lambda + EventBridge + SQS | 70〜90万円 |
| フルスタック | Lambda + AppSync + Amplify | 75〜95万円 |
サーバーレスのスキルを持つエンジニアの需要は高く、Codex CLIで効率的に学習・開発できることは大きなアドバンテージです。
Lambda関数の実装をCodex CLIで効率化する
基本的なLambda関数の生成
プロンプト例:
S3にCSVファイルがアップロードされたら、内容をパースして
DynamoDBに書き込むLambda関数をPythonで作成してください。
要件:
- S3イベントトリガー
- CSVのヘッダー行をキーとして使用
- DynamoDBへのバッチ書き込み(25件ずつ)
- エラー時はSNSに通知
- 処理時間とレコード数をCloudWatchメトリクスに送信
Codex CLIが生成するコードは、AWSのベストプラクティスに沿った堅牢なものになります。
import csv
import io
import json
import os
import time
from typing import Any

import boto3
from botocore.exceptions import ClientError

s3 = boto3.client("s3")
dynamodb = boto3.resource("dynamodb")
sns = boto3.client("sns")
cloudwatch = boto3.client("cloudwatch")

TABLE_NAME = os.environ["TABLE_NAME"]
SNS_TOPIC_ARN = os.environ["SNS_TOPIC_ARN"]
table = dynamodb.Table(TABLE_NAME)


def handler(event: dict, context: Any) -> dict:
    """S3 CSVファイルをDynamoDBに取り込むLambda関数"""
    start_time = time.time()
    total_records = 0
    errors = []

    for record in event["Records"]:
        bucket = record["s3"]["bucket"]["name"]
        key = record["s3"]["object"]["key"]

        try:
            response = s3.get_object(Bucket=bucket, Key=key)
            content = response["Body"].read().decode("utf-8")
            reader = csv.DictReader(io.StringIO(content))

            # バッチ書き込み(25件ずつ)
            batch = []
            with table.batch_writer() as writer:
                for row in reader:
                    writer.put_item(Item={
                        "pk": row.get("id", str(total_records)),
                        "source_file": key,
                        **{k: v for k, v in row.items() if v},
                    })
                    total_records += 1

        except ClientError as e:
            error_msg = f"処理エラー: {key} - {str(e)}"
            errors.append(error_msg)
            sns.publish(
                TopicArn=SNS_TOPIC_ARN,
                Subject="Lambda CSV Import Error",
                Message=json.dumps({
                    "bucket": bucket,
                    "key": key,
                    "error": str(e),
                }),
            )

    # CloudWatchメトリクス送信
    elapsed = time.time() - start_time
    cloudwatch.put_metric_data(
        Namespace="CSVImporter",
        MetricData=[
            {
                "MetricName": "RecordsProcessed",
                "Value": total_records,
                "Unit": "Count",
            },
            {
                "MetricName": "ProcessingTime",
                "Value": elapsed,
                "Unit": "Seconds",
            },
        ],
    )

    return {
        "statusCode": 200,
        "body": json.dumps({
            "processed": total_records,
            "errors": len(errors),
            "elapsed_seconds": round(elapsed, 2),
        }),
    }
コールドスタート最適化
サーバーレスで避けて通れないのがコールドスタートの問題です。Codex CLIに最適化を依頼してみましょう。
プロンプト例:
上記のLambda関数のコールドスタートを最適化してください。
- グローバルスコープでの初期化
- Provisioned Concurrency対応
- Lambda Layers活用
- レスポンスストリーミング対応
# コールドスタート最適化版
# グローバルスコープで初期化(ウォームスタート時に再利用)
import boto3
from functools import lru_cache
# 接続の再利用
_s3_client = None
_dynamodb_resource = None
def get_s3_client():
global _s3_client
if _s3_client is None:
_s3_client = boto3.client(
"s3",
config=boto3.session.Config(
max_pool_connections=10,
connect_timeout=5,
read_timeout=10,
),
)
return _s3_client
def get_dynamodb_table(table_name: str):
global _dynamodb_resource
if _dynamodb_resource is None:
_dynamodb_resource = boto3.resource("dynamodb")
return _dynamodb_resource.Table(table_name)
@lru_cache(maxsize=1)
def get_config() -> dict:
"""環境変数からの設定読み込みをキャッシュ"""
return {
"table_name": os.environ["TABLE_NAME"],
"sns_topic": os.environ["SNS_TOPIC_ARN"],
"batch_size": int(os.environ.get("BATCH_SIZE", "25")),
}Step Functionsでワークフローを構築する
複数のLambda関数を組み合わせた複雑なワークフローは、Step Functionsで管理するのが定石です。Codex CLIを使えば、ASL(Amazon States Language)の定義も効率的に生成できます。
プロンプト例:
注文処理のStep Functionsワークフローを作成してください。
フロー:
1. 注文バリデーション
2. 在庫チェック(並列で複数商品)
3. 在庫不足の場合 → 顧客に通知して終了
4. 決済処理
5. 決済失敗時 → 3回リトライ、最終失敗時は手動レビューキューへ
6. 出荷指示
7. 完了通知(メール + プッシュ通知を並列)
タイムアウト: 全体で30分
{
"Comment": "注文処理ワークフロー",
"StartAt": "ValidateOrder",
"TimeoutSeconds": 1800,
"States": {
"ValidateOrder": {
"Type": "Task",
"Resource": "${ValidateOrderFunctionArn}",
"Next": "CheckInventory",
"Catch": [{
"ErrorEquals": ["ValidationError"],
"Next": "OrderRejected"
}]
},
"CheckInventory": {
"Type": "Map",
"ItemsPath": "$.order.items",
"MaxConcurrency": 5,
"Iterator": {
"StartAt": "CheckItemStock",
"States": {
"CheckItemStock": {
"Type": "Task",
"Resource": "${CheckStockFunctionArn}",
"End": true
}
}
},
"Next": "EvaluateStock",
"ResultPath": "$.stockResults"
},
"EvaluateStock": {
"Type": "Choice",
"Choices": [{
"Variable": "$.stockResults[0].available",
"BooleanEquals": false,
"Next": "NotifyOutOfStock"
}],
"Default": "ProcessPayment"
},
"ProcessPayment": {
"Type": "Task",
"Resource": "${ProcessPaymentFunctionArn}",
"Retry": [{
"ErrorEquals": ["PaymentError"],
"IntervalSeconds": 5,
"MaxAttempts": 3,
"BackoffRate": 2.0
}],
"Catch": [{
"ErrorEquals": ["States.ALL"],
"Next": "ManualReviewQueue"
}],
"Next": "CreateShipment"
},
"CreateShipment": {
"Type": "Task",
"Resource": "${CreateShipmentFunctionArn}",
"Next": "SendNotifications"
},
"SendNotifications": {
"Type": "Parallel",
"Branches": [
{
"StartAt": "SendEmail",
"States": {
"SendEmail": {
"Type": "Task",
"Resource": "${SendEmailFunctionArn}",
"End": true
}
}
},
{
"StartAt": "SendPush",
"States": {
"SendPush": {
"Type": "Task",
"Resource": "${SendPushFunctionArn}",
"End": true
}
}
}
],
"Next": "OrderCompleted"
},
"OrderCompleted": {
"Type": "Succeed"
},
"NotifyOutOfStock": {
"Type": "Task",
"Resource": "${NotifyCustomerFunctionArn}",
"Next": "OrderCancelled"
},
"OrderCancelled": {
"Type": "Fail",
"Cause": "在庫不足によりキャンセル"
},
"ManualReviewQueue": {
"Type": "Task",
"Resource": "arn:aws:states:::sqs:sendMessage",
"Parameters": {
"QueueUrl": "${ManualReviewQueueUrl}",
"MessageBody.$": "States.JsonToString($)"
},
"Next": "OrderPendingReview"
},
"OrderPendingReview": {
"Type": "Succeed"
},
"OrderRejected": {
"Type": "Fail",
"Cause": "注文バリデーション失敗"
}
}
}API Gateway + Lambdaの構築
REST APIのサーバーレス構築もCodex CLIの得意分野です。
プロンプト例:
ユーザー管理APIをAPI Gateway + Lambdaで作成してください。
エンドポイント:
- POST /users (ユーザー作成)
- GET /users/{id} (ユーザー取得)
- PUT /users/{id} (ユーザー更新)
- DELETE /users/{id} (ユーザー削除)
- GET /users?page=1&limit=20 (ユーザー一覧)

要件:
- DynamoDB Single Table Design
- Cognito認証
- リクエストバリデーション(pydantic)
- CORS対応
- レスポンスの統一フォーマット
import json
import os
from datetime import datetime
from typing import Any
from uuid import uuid4
import boto3
from pydantic import BaseModel, EmailStr, Field
dynamodb = boto3.resource("dynamodb")
table = dynamodb.Table(os.environ["TABLE_NAME"])
class CreateUserRequest(BaseModel):
name: str = Field(min_length=1, max_length=100)
email: EmailStr
role: str = Field(default="member", pattern="^(admin|member|viewer)$")
class UpdateUserRequest(BaseModel):
name: str | None = Field(None, min_length=1, max_length=100)
email: EmailStr | None = None
role: str | None = Field(None, pattern="^(admin|member|viewer)$")
def response(status_code: int, body: dict) -> dict:
"""統一レスポンスフォーマット"""
return {
"statusCode": status_code,
"headers": {
"Content-Type": "application/json",
"Access-Control-Allow-Origin": "*",
"Access-Control-Allow-Methods": "GET,POST,PUT,DELETE,OPTIONS",
"Access-Control-Allow-Headers": "Content-Type,Authorization",
},
"body": json.dumps(body, ensure_ascii=False, default=str),
}
def create_user(event: dict, context: Any) -> dict:
"""POST /users"""
try:
body = json.loads(event["body"])
req = CreateUserRequest(**body)
except Exception as e:
return response(400, {"error": f"バリデーションエラー: {str(e)}"})
user_id = str(uuid4())
now = datetime.utcnow().isoformat()
item = {
"PK": f"USER#{user_id}",
"SK": "PROFILE",
"user_id": user_id,
"name": req.name,
"email": req.email,
"role": req.role,
"created_at": now,
"updated_at": now,
}
table.put_item(Item=item)
return response(201, {"user": item})
def get_user(event: dict, context: Any) -> dict:
"""GET /users/{id}"""
user_id = event["pathParameters"]["id"]
result = table.get_item(
Key={"PK": f"USER#{user_id}", "SK": "PROFILE"}
)
item = result.get("Item")
if not item:
return response(404, {"error": "ユーザーが見つかりません"})
return response(200, {"user": item})
def list_users(event: dict, context: Any) -> dict:
"""GET /users"""
params = event.get("queryStringParameters") or {}
limit = min(int(params.get("limit", "20")), 100)
last_key = params.get("cursor")
scan_params = {
"FilterExpression": "SK = :sk",
"ExpressionAttributeValues": {":sk": "PROFILE"},
"Limit": limit,
}
if last_key:
scan_params["ExclusiveStartKey"] = json.loads(last_key)
result = table.scan(**scan_params)
return response(200, {
"users": result["Items"],
"cursor": json.dumps(result.get("LastEvaluatedKey"))
if result.get("LastEvaluatedKey") else None,
})SAM/CDKでインフラ定義を自動生成する
Lambda関数だけでなく、インフラ定義もCodex CLIで生成できます。AWS SAMテンプレートをプロンプトから一発で作成しましょう。
プロンプト例:
上記のユーザー管理APIのSAMテンプレートを作成してください。
- DynamoDBテーブル(オンデマンドキャパシティ)
- Cognito User Pool
- API Gateway(Cognito認証付き)
- Lambda関数(各エンドポイント)
- CloudWatch Logsの保持期間30日
- X-Rayトレーシング有効AWSTemplateFormatVersion: '2010-09-09'
Transform: AWS::Serverless-2016-10-31
Description: ユーザー管理サーバーレスAPI
Globals:
Function:
Runtime: python3.12
Timeout: 30
MemorySize: 256
Tracing: Active
Environment:
Variables:
TABLE_NAME: !Ref UsersTable
POWERTOOLS_SERVICE_NAME: user-api
Resources:
UsersTable:
Type: AWS::DynamoDB::Table
Properties:
TableName: !Sub '${AWS::StackName}-users'
BillingMode: PAY_PER_REQUEST
AttributeDefinitions:
- AttributeName: PK
AttributeType: S
- AttributeName: SK
AttributeType: S
KeySchema:
- AttributeName: PK
KeyType: HASH
- AttributeName: SK
KeyType: RANGE
CognitoUserPool:
Type: AWS::Cognito::UserPool
Properties:
UserPoolName: !Sub '${AWS::StackName}-users'
AutoVerifiedAttributes:
- email
Policies:
PasswordPolicy:
MinimumLength: 8
RequireUppercase: true
RequireLowercase: true
RequireNumbers: true
UserPoolClient:
Type: AWS::Cognito::UserPoolClient
Properties:
UserPoolId: !Ref CognitoUserPool
GenerateSecret: false
ApiGateway:
Type: AWS::Serverless::Api
Properties:
StageName: prod
Auth:
DefaultAuthorizer: CognitoAuthorizer
Authorizers:
CognitoAuthorizer:
UserPoolArn: !GetAtt CognitoUserPool.Arn
Cors:
AllowMethods: "'GET,POST,PUT,DELETE,OPTIONS'"
AllowHeaders: "'Content-Type,Authorization'"
AllowOrigin: "'*'"
CreateUserFunction:
Type: AWS::Serverless::Function
Properties:
Handler: handlers/users.create_user
Events:
Api:
Type: Api
Properties:
RestApiId: !Ref ApiGateway
Path: /users
Method: POST
Policies:
- DynamoDBCrudPolicy:
TableName: !Ref UsersTable
GetUserFunction:
Type: AWS::Serverless::Function
Properties:
Handler: handlers/users.get_user
Events:
Api:
Type: Api
Properties:
RestApiId: !Ref ApiGateway
Path: /users/{id}
Method: GET
Policies:
- DynamoDBReadPolicy:
TableName: !Ref UsersTableテストの自動生成
サーバーレスアプリケーションのテストは、ローカル環境での再現が難しいことが課題です。Codex CLIでmotoやLocalStackを使ったテストコードを生成しましょう。
プロンプト例:
create_user Lambda関数のユニットテストをpytestで作成して。
- motoでDynamoDBをモック
- 正常系: ユーザー作成成功
- 異常系: バリデーションエラー、重複メール
- エッジケース: 空文字、特殊文字、最大長
import json
import os
import pytest
import boto3
from moto import mock_aws
@pytest.fixture
def aws_env(monkeypatch):
monkeypatch.setenv("TABLE_NAME", "test-users")
monkeypatch.setenv("AWS_DEFAULT_REGION", "ap-northeast-1")
@pytest.fixture
def dynamodb_table(aws_env):
with mock_aws():
client = boto3.resource("dynamodb", region_name="ap-northeast-1")
table = client.create_table(
TableName="test-users",
KeySchema=[
{"AttributeName": "PK", "KeyType": "HASH"},
{"AttributeName": "SK", "KeyType": "RANGE"},
],
AttributeDefinitions=[
{"AttributeName": "PK", "AttributeType": "S"},
{"AttributeName": "SK", "AttributeType": "S"},
],
BillingMode="PAY_PER_REQUEST",
)
yield table
class TestCreateUser:
def test_success(self, dynamodb_table):
from handlers.users import create_user
event = {
"body": json.dumps({
"name": "田中太郎",
"email": "[email protected]",
"role": "member",
})
}
result = create_user(event, None)
assert result["statusCode"] == 201
body = json.loads(result["body"])
assert body["user"]["name"] == "田中太郎"
assert body["user"]["email"] == "[email protected]"
def test_validation_error_invalid_email(self, dynamodb_table):
from handlers.users import create_user
event = {"body": json.dumps({"name": "テスト", "email": "invalid"})}
result = create_user(event, None)
assert result["statusCode"] == 400
def test_validation_error_empty_name(self, dynamodb_table):
from handlers.users import create_user
event = {
"body": json.dumps({
"name": "",
"email": "[email protected]"
})
}
result = create_user(event, None)
assert result["statusCode"] == 400
def test_special_characters_in_name(self, dynamodb_table):
from handlers.users import create_user
event = {
"body": json.dumps({
"name": "テスト@ユーザー#1<script>",
"email": "[email protected]",
})
}
result = create_user(event, None)
assert result["statusCode"] == 201コスト最適化のベストプラクティス
サーバーレスは「使った分だけ課金」ですが、設計次第でコストは大きく変わります。
Lambda関数のコスト最適化
| 最適化ポイント | 手法 | 効果 |
|---|---|---|
| メモリ設定 | Power Tuning ツールで最適値を探索 | 最大40%削減 |
| 実行時間 | 不要な処理の削除・並列化 | 最大30%削減 |
| コールドスタート | Provisioned Concurrency | レイテンシ安定化 |
| アーキテクチャ | SQSバッファリングで実行回数削減 | 最大50%削減 |
| ランタイム | Python → Rust(Lambda Web Adapter) | 最大70%削減 |
プロンプト例:
このLambda関数のコストを最適化して。
現状: メモリ1024MB、平均実行時間8秒、月間100万回実行
目標: 月額コストを50%削減
SES案件でのサーバーレス開発の実践ポイント
案件別のアーキテクチャパターン
- ECバックエンド案件: API Gateway + Lambda + DynamoDB + Cognito
- データ処理案件: S3 + Lambda + Step Functions + Glue
- IoTプラットフォーム: IoT Core + Lambda + Kinesis + Timestream
- マイクロサービス移行: EventBridge + Lambda + SQS + SNS
現場で求められるスキルセット
- 必須: Lambda、API Gateway、DynamoDB、IAM
- あると強い: Step Functions、EventBridge、CDK/SAM
- 差別化要因: Observability(X-Ray、CloudWatch Insights)、コスト最適化
Codex CLIを使えば、これらの技術をプロンプトベースで素早く学習しながら、実際のコードを生成できます。
まとめ:Codex CLIでサーバーレス開発を加速しよう
サーバーレスアーキテクチャは現代のクラウド開発の主流となりつつあります。OpenAI Codex CLIを活用すれば、Lambda関数の実装からStep Functionsのワークフロー設計、SAMテンプレートの生成まで、一連の開発プロセスを大幅に効率化できます。
SESエンジニアとして、サーバーレスのスキルは案件獲得の大きな武器になります。Codex CLIと組み合わせることで、学習コストを抑えながら実践力を身につけましょう。
Codex CLIの基本的な使い方はCodex CLI入門ガイドを、インフラ自動化はCodex CLIインフラ自動化ガイドをご覧ください。テスト自動化についてはCodex CLIテスト自動化、API開発の詳細はCodex CLI API開発ガイドが参考になります。