「デザインパターンは知っているけど、実務でどう使えばいいかわからない」——そんな悩みをOpenAI Codex CLIが解決します。
Codex CLIにデザインパターンの適用を指示するだけで、プロジェクトのコンテキストに合わせたパターン実装を自動生成できます。 本記事では、SES現場で実際に使える主要デザインパターンのCodex CLIによる実装方法を解説します。
この記事を3秒でまとめると
- Codex CLIでGoFデザインパターンをプロジェクトに合わせて自動実装
- Factory、Strategy、Observer、Decoratorなど実務で頻出する8パターンをカバー
- クリーンアーキテクチャの層構造もCodex CLIで一括スキャフォールド可能
デザインパターンとCodex CLIの組み合わせが強い理由
デザインパターンの最大の課題は「適用判断」と「具体的な実装」のギャップです。パターンの概念を知っていても、目の前のコードにどう適用すればいいかわからない——SESエンジニアの多くが経験する壁です。
Codex CLIが解決する3つの課題
- パターン選択: コードの構造を分析して、最適なパターンを提案
- 具体的な実装: プロジェクトの言語・フレームワークに合わせた実装を生成
- 既存コードへの適用: リファクタリング対象のコードにパターンを段階的に適用
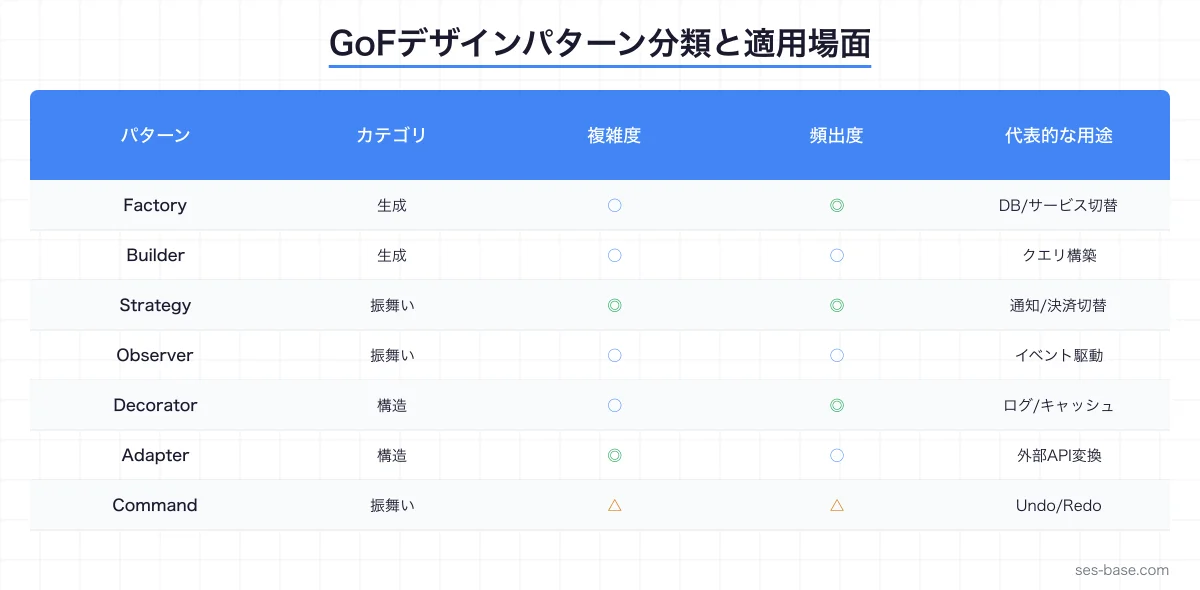
生成パターン(Creational Patterns)
Factory Method パターン
SES案件でよくある「複数のデータソースに対応するシステム」にFactory Methodを適用します。
Codex CLIへのプロンプト:
以下の要件でFactory Methodパターンを実装してください:
- データソース: PostgreSQL、MongoDB、Redis
- 各データソースにはconnect()、query()、disconnect()メソッドが必要
- 環境変数でデータソースを切り替え可能にする
- TypeScriptで型安全に実装する
生成されるコード:
// データソースのインターフェース
interface DataSource {
  connect(): Promise<void>;
  query<T>(operation: string, params?: Record<string, unknown>): Promise<T>;
  disconnect(): Promise<void>;
  isConnected(): boolean;
}

// 抽象Factoryクラス
abstract class DataSourceFactory {
  abstract createDataSource(config: DataSourceConfig): DataSource;

  // テンプレートメソッド:接続付きのデータソース生成
  async createConnected(config: DataSourceConfig): Promise<DataSource> {
    const source = this.createDataSource(config);
    await source.connect();
    return source;
  }
}

// PostgreSQL実装
class PostgresDataSource implements DataSource {
  private pool: Pool | null = null;

  constructor(private config: PostgresConfig) {}

  async connect(): Promise<void> {
    this.pool = new Pool({
      host: this.config.host,
      port: this.config.port,
      database: this.config.database,
      user: this.config.user,
      password: this.config.password,
      max: this.config.maxConnections || 10,
    });
    await this.pool.query('SELECT 1');
  }

  async query<T>(sql: string, params?: Record<string, unknown>): Promise<T> {
    if (!this.pool) throw new Error('Not connected');
    const result = await this.pool.query(sql, Object.values(params || {}));
    return result.rows as T;
  }

  async disconnect(): Promise<void> {
    await this.pool?.end();
    this.pool = null;
  }

  isConnected(): boolean {
    return this.pool !== null;
  }
}

// MongoDB実装
class MongoDataSource implements DataSource {
  private client: MongoClient | null = null;
  private db: Db | null = null;

  constructor(private config: MongoConfig) {}

  async connect(): Promise<void> {
    this.client = new MongoClient(this.config.uri);
    await this.client.connect();
    this.db = this.client.db(this.config.database);
  }

  async query<T>(collection: string, params?: Record<string, unknown>): Promise<T> {
    if (!this.db) throw new Error('Not connected');
    const result = await this.db.collection(collection).find(params || {}).toArray();
    return result as T;
  }

  async disconnect(): Promise<void> {
    await this.client?.close();
    this.client = null;
    this.db = null;
  }

  isConnected(): boolean {
    return this.client !== null;
  }
}

// Factory実装
class ConcreteDataSourceFactory extends DataSourceFactory {
  createDataSource(config: DataSourceConfig): DataSource {
    switch (config.type) {
      case 'postgres':
        return new PostgresDataSource(config as PostgresConfig);
      case 'mongodb':
        return new MongoDataSource(config as MongoConfig);
      case 'redis':
        return new RedisDataSource(config as RedisConfig);
      default:
        throw new Error(`Unsupported data source type: ${config.type}`);
    }
  }
}

// 使用例
const factory = new ConcreteDataSourceFactory();
const dataSource = await factory.createConnected({
  type: process.env.DB_TYPE as 'postgres' | 'mongodb' | 'redis',
  host: process.env.DB_HOST!,
  // ...
});
Abstract Factory パターン
UIコンポーネントのテーマ切り替えなど、関連するオブジェクト群を一括生成する場合に使います。
// テーマファクトリー
interface UIFactory {
  createButton(label: string): Button;
  createInput(placeholder: string): Input;
  createCard(title: string, content: string): Card;
  createModal(title: string): Modal;
}

class LightThemeFactory implements UIFactory {
  createButton(label: string): Button {
    return new LightButton(label, {
      bg: '#ffffff', color: '#1a1a2e', border: '#e5e7eb',
      hoverBg: '#f3f4f6',
    });
  }
  createInput(placeholder: string): Input {
    return new LightInput(placeholder, {
      bg: '#ffffff', border: '#d1d5db', focusBorder: '#4285f4',
    });
  }
  // ...
}

class DarkThemeFactory implements UIFactory {
  createButton(label: string): Button {
    return new DarkButton(label, {
      bg: '#1e293b', color: '#f8fafc', border: '#334155',
      hoverBg: '#334155',
    });
  }
  // ...
}

// ファクトリーの切り替え
function getThemeFactory(theme: 'light' | 'dark'): UIFactory {
  return theme === 'dark' ? new DarkThemeFactory() : new LightThemeFactory();
}
Builder パターン
複雑なオブジェクト(クエリ、設定、リクエスト)の構築にはBuilderパターンが最適です。
class QueryBuilder<T> {
  private conditions: string[] = [];
  private orderByClause: string[] = [];
  private limitValue?: number;
  private offsetValue?: number;
  private selectFields: string[] = ['*'];
  private joinClauses: string[] = [];

  constructor(private tableName: string) {}

  select(...fields: (keyof T)[]): this {
    this.selectFields = fields as string[];
    return this;
  }

  where(condition: string): this {
    this.conditions.push(condition);
    return this;
  }

  whereEquals(field: keyof T, value: string | number): this {
    this.conditions.push(`${String(field)} = '${value}'`);
    return this;
  }

  join(table: string, on: string, type: 'INNER' | 'LEFT' | 'RIGHT' = 'INNER'): this {
    this.joinClauses.push(`${type} JOIN ${table} ON ${on}`);
    return this;
  }

  orderBy(field: keyof T, direction: 'ASC' | 'DESC' = 'ASC'): this {
    this.orderByClause.push(`${String(field)} ${direction}`);
    return this;
  }

  limit(value: number): this {
    this.limitValue = value;
    return this;
  }

  offset(value: number): this {
    this.offsetValue = value;
    return this;
  }

  build(): string {
    let query = `SELECT ${this.selectFields.join(', ')} FROM ${this.tableName}`;

    if (this.joinClauses.length > 0) {
      query += ` ${this.joinClauses.join(' ')}`;
    }

    if (this.conditions.length > 0) {
      query += ` WHERE ${this.conditions.join(' AND ')}`;
    }

    if (this.orderByClause.length > 0) {
      query += ` ORDER BY ${this.orderByClause.join(', ')}`;
    }

    if (this.limitValue !== undefined) {
      query += ` LIMIT ${this.limitValue}`;
    }

    if (this.offsetValue !== undefined) {
      query += ` OFFSET ${this.offsetValue}`;
    }

    return query;
  }
}

// 使用例
const query = new QueryBuilder<User>('users')
  .select('id', 'name', 'email')
  .whereEquals('status', 'active')
  .where('created_at > NOW() - INTERVAL 30 DAY')
  .join('departments', 'users.dept_id = departments.id', 'LEFT')
  .orderBy('name', 'ASC')
  .limit(20)
  .offset(0)
  .build();
構造パターン(Structural Patterns)
Decorator パターン
SES案件のAPI開発で頻出する、ロギング・キャッシュ・認証を横断的に追加するパターンです。
// 基本インターフェース
interface ApiClient {
  get<T>(path: string): Promise<T>;
  post<T>(path: string, body: unknown): Promise<T>;
}

// 基本実装
class HttpApiClient implements ApiClient {
  constructor(private baseUrl: string) {}

  async get<T>(path: string): Promise<T> {
    const res = await fetch(`${this.baseUrl}${path}`);
    return res.json() as Promise<T>;
  }

  async post<T>(path: string, body: unknown): Promise<T> {
    const res = await fetch(`${this.baseUrl}${path}`, {
      method: 'POST',
      headers: { 'Content-Type': 'application/json' },
      body: JSON.stringify(body),
    });
    return res.json() as Promise<T>;
  }
}

// ログデコレータ
class LoggingDecorator implements ApiClient {
  constructor(private client: ApiClient, private logger: Logger) {}

  async get<T>(path: string): Promise<T> {
    const start = Date.now();
    this.logger.info(`GET ${path}`);
    try {
      const result = await this.client.get<T>(path);
      this.logger.info(`GET ${path} completed`, { duration: Date.now() - start });
      return result;
    } catch (error) {
      this.logger.error(`GET ${path} failed`, { duration: Date.now() - start, error });
      throw error;
    }
  }

  async post<T>(path: string, body: unknown): Promise<T> {
    const start = Date.now();
    this.logger.info(`POST ${path}`, { bodySize: JSON.stringify(body).length });
    try {
      const result = await this.client.post<T>(path, body);
      this.logger.info(`POST ${path} completed`, { duration: Date.now() - start });
      return result;
    } catch (error) {
      this.logger.error(`POST ${path} failed`, { duration: Date.now() - start, error });
      throw error;
    }
  }
}

// キャッシュデコレータ
class CachingDecorator implements ApiClient {
  private cache = new Map<string, { data: unknown; expiry: number }>();

  constructor(private client: ApiClient, private ttlMs: number = 60000) {}

  async get<T>(path: string): Promise<T> {
    const cached = this.cache.get(path);
    if (cached && cached.expiry > Date.now()) {
      return cached.data as T;
    }

    const result = await this.client.get<T>(path);
    this.cache.set(path, { data: result, expiry: Date.now() + this.ttlMs });
    return result;
  }

  async post<T>(path: string, body: unknown): Promise<T> {
    // POST はキャッシュしない
    return this.client.post<T>(path, body);
  }
}

// 認証デコレータ
class AuthDecorator implements ApiClient {
  constructor(private client: ApiClient, private getToken: () => Promise<string>) {}

  async get<T>(path: string): Promise<T> {
    const token = await this.getToken();
    // 認証ヘッダーを内部的に付与(実装では BaseClient を拡張)
    return this.client.get<T>(path);
  }

  async post<T>(path: string, body: unknown): Promise<T> {
    const token = await this.getToken();
    return this.client.post<T>(path, body);
  }
}

// デコレータを組み合わせて使用
const client = new AuthDecorator(
  new CachingDecorator(
    new LoggingDecorator(
      new HttpApiClient('https://api.example.com'),
      logger
    ),
    300000 // 5分キャッシュ
  ),
  () => authService.getToken()
);
Adapter パターン
外部APIのレスポンス形式を内部モデルに変換するアダプターパターンです。
// 内部モデル
interface User {
  id: string;
  fullName: string;
  email: string;
  role: 'admin' | 'user' | 'viewer';
  createdAt: Date;
}

// 外部API A のレスポンス形式
interface ExternalUserA {
  user_id: number;
  first_name: string;
  last_name: string;
  mail_address: string;
  permission_level: number;
  registered_date: string;
}

// 外部API B のレスポンス形式
interface ExternalUserB {
  uid: string;
  display_name: string;
  contact: { email: string; phone?: string };
  access: 'FULL' | 'READ_WRITE' | 'READ_ONLY';
  metadata: { created: number };
}

// アダプター A
class UserAdapterA {
  static adapt(external: ExternalUserA): User {
    const roleMap: Record<number, User['role']> = {
      0: 'viewer',
      1: 'user',
      2: 'admin',
    };

    return {
      id: String(external.user_id),
      fullName: `${external.first_name} ${external.last_name}`,
      email: external.mail_address,
      role: roleMap[external.permission_level] || 'viewer',
      createdAt: new Date(external.registered_date),
    };
  }
}

// アダプター B
class UserAdapterB {
  static adapt(external: ExternalUserB): User {
    const roleMap: Record<string, User['role']> = {
      'FULL': 'admin',
      'READ_WRITE': 'user',
      'READ_ONLY': 'viewer',
    };

    return {
      id: external.uid,
      fullName: external.display_name,
      email: external.contact.email,
      role: roleMap[external.access] || 'viewer',
      createdAt: new Date(external.metadata.created * 1000),
    };
  }
}
振る舞いパターン(Behavioral Patterns)
Strategy パターン
SES案件での料金計算・通知送信・認証方式の切り替えに最適です。
// 通知戦略のインターフェース
interface NotificationStrategy {
  send(recipient: string, message: string, options?: NotificationOptions): Promise<void>;
  validate(recipient: string): boolean;
}

// メール通知
class EmailStrategy implements NotificationStrategy {
  constructor(private transporter: Transporter) {}

  async send(recipient: string, message: string, options?: NotificationOptions): Promise<void> {
    await this.transporter.sendMail({
      to: recipient,
      subject: options?.subject || 'Notification',
      html: message,
    });
  }

  validate(recipient: string): boolean {
    return /^[^\s@]+@[^\s@]+\.[^\s@]+$/.test(recipient);
  }
}

// Slack通知
class SlackStrategy implements NotificationStrategy {
  constructor(private webhookUrl: string) {}

  async send(recipient: string, message: string): Promise<void> {
    await fetch(this.webhookUrl, {
      method: 'POST',
      headers: { 'Content-Type': 'application/json' },
      body: JSON.stringify({ channel: recipient, text: message }),
    });
  }

  validate(recipient: string): boolean {
    return recipient.startsWith('#') || recipient.startsWith('@');
  }
}

// SMS通知
class SmsStrategy implements NotificationStrategy {
  constructor(private twilioClient: TwilioClient) {}

  async send(recipient: string, message: string): Promise<void> {
    await this.twilioClient.messages.create({
      to: recipient,
      from: process.env.TWILIO_PHONE_NUMBER,
      body: message,
    });
  }

  validate(recipient: string): boolean {
    return /^\+[1-9]\d{1,14}$/.test(recipient);
  }
}

// コンテキスト:通知サービス
class NotificationService {
  private strategies = new Map<string, NotificationStrategy>();

  register(type: string, strategy: NotificationStrategy): void {
    this.strategies.set(type, strategy);
  }

  async notify(
    type: string,
    recipient: string,
    message: string,
    options?: NotificationOptions
  ): Promise<void> {
    const strategy = this.strategies.get(type);
    if (!strategy) throw new Error(`Unknown notification type: ${type}`);

    if (!strategy.validate(recipient)) {
      throw new Error(`Invalid recipient for ${type}: ${recipient}`);
    }

    await strategy.send(recipient, message, options);
  }
}

// セットアップ
const notifier = new NotificationService();
notifier.register('email', new EmailStrategy(mailer));
notifier.register('slack', new SlackStrategy(process.env.SLACK_WEBHOOK!));
notifier.register('sms', new SmsStrategy(twilioClient));

// 使用
await notifier.notify('email', '[email protected]', 'Your report is ready');
await notifier.notify('slack', '#alerts', ':warning: Server CPU > 90%');
Observer パターン
イベント駆動アーキテクチャの基盤となるパターンです。
// 型安全なイベントエミッター
type EventMap = {
  'user:created': { userId: string; email: string };
  'user:updated': { userId: string; changes: Record<string, unknown> };
  'order:placed': { orderId: string; userId: string; total: number };
  'order:completed': { orderId: string; completedAt: Date };
  'payment:received': { orderId: string; amount: number; method: string };
};

class TypedEventEmitter<T extends Record<string, unknown>> {
  private listeners = new Map<keyof T, Set<Function>>();

  on<K extends keyof T>(event: K, listener: (data: T[K]) => void | Promise<void>): () => void {
    if (!this.listeners.has(event)) {
      this.listeners.set(event, new Set());
    }
    this.listeners.get(event)!.add(listener);

    // unsubscribe関数を返す
    return () => {
      this.listeners.get(event)?.delete(listener);
    };
  }

  async emit<K extends keyof T>(event: K, data: T[K]): Promise<void> {
    const handlers = this.listeners.get(event);
    if (!handlers) return;

    const promises = Array.from(handlers).map(async (handler) => {
      try {
        await handler(data);
      } catch (error) {
        console.error(`Error in event handler for ${String(event)}:`, error);
      }
    });

    await Promise.allSettled(promises);
  }
}

// 使用例
const events = new TypedEventEmitter<EventMap>();

// ユーザー作成時のリスナー登録
events.on('user:created', async (data) => {
  await sendWelcomeEmail(data.email);
});

events.on('user:created', async (data) => {
  await createDefaultSettings(data.userId);
});

events.on('order:placed', async (data) => {
  await notifySlack(`New order: ${data.orderId} ($${data.total})`);
});

// イベント発行
await events.emit('user:created', { userId: '123', email: '[email protected]' });
Command パターン
Undo/Redo機能や操作履歴の記録にCommandパターンを使います。
interface Command {
  execute(): Promise<void>;
  undo(): Promise<void>;
  describe(): string;
}

class CommandHistory {
  private history: Command[] = [];
  private undoneCommands: Command[] = [];

  async execute(command: Command): Promise<void> {
    await command.execute();
    this.history.push(command);
    this.undoneCommands = []; // 新しいコマンド実行でredo履歴をクリア
  }

  async undo(): Promise<void> {
    const command = this.history.pop();
    if (!command) throw new Error('Nothing to undo');
    await command.undo();
    this.undoneCommands.push(command);
  }

  async redo(): Promise<void> {
    const command = this.undoneCommands.pop();
    if (!command) throw new Error('Nothing to redo');
    await command.execute();
    this.history.push(command);
  }

  getHistory(): string[] {
    return this.history.map((cmd) => cmd.describe());
  }
}

// 具体コマンド例:ドキュメント編集
class InsertTextCommand implements Command {
  constructor(
    private document: Document,
    private position: number,
    private text: string
  ) {}

  async execute(): Promise<void> {
    this.document.insertAt(this.position, this.text);
  }

  async undo(): Promise<void> {
    this.document.deleteRange(this.position, this.position + this.text.length);
  }

  describe(): string {
    return `Insert "${this.text.substring(0, 20)}..." at position ${this.position}`;
  }
}
クリーンアーキテクチャのスキャフォールド
Codex CLIで一括生成
Codex CLIに以下のプロンプトを投げると、クリーンアーキテクチャの層構造を一括スキャフォールドできます。
以下の仕様でクリーンアーキテクチャのプロジェクト構造を生成してください:
- ドメイン: ユーザー管理(User, Role, Permission)
- ユースケース: 登録、認証、プロフィール更新、権限管理
- インフラ: PostgreSQL + Redis
- プレゼンテーション: Express.js REST API
- 各層の依存関係は内側のみ(依存性逆転の原則を遵守)
生成されるディレクトリ構造:
src/
├── domain/                    # ドメイン層
│   ├── entities/
│   │   ├── User.ts
│   │   ├── Role.ts
│   │   └── Permission.ts
│   ├── repositories/          # リポジトリインターフェース
│   │   ├── IUserRepository.ts
│   │   └── IRoleRepository.ts
│   ├── services/              # ドメインサービス
│   │   └── AuthDomainService.ts
│   └── value-objects/
│       ├── Email.ts
│       └── Password.ts
├── application/               # アプリケーション層
│   ├── use-cases/
│   │   ├── RegisterUser.ts
│   │   ├── AuthenticateUser.ts
│   │   ├── UpdateProfile.ts
│   │   └── ManagePermissions.ts
│   ├── dto/
│   │   ├── CreateUserDto.ts
│   │   └── UpdateProfileDto.ts
│   └── interfaces/
│       ├── IAuthService.ts
│       └── ICacheService.ts
├── infrastructure/            # インフラ層
│   ├── database/
│   │   ├── PostgresUserRepository.ts
│   │   └── PostgresRoleRepository.ts
│   ├── cache/
│   │   └── RedisCacheService.ts
│   ├── auth/
│   │   └── JwtAuthService.ts
│   └── config/
│       └── database.ts
└── presentation/              # プレゼンテーション層
    ├── controllers/
    │   ├── UserController.ts
    │   └── AuthController.ts
    ├── middleware/
    │   ├── auth.ts
    │   └── validation.ts
    └── routes/
        ├── user.routes.ts
        └── auth.routes.ts
ドメインエンティティの例
// domain/entities/User.ts
export class User {
  private constructor(
    public readonly id: string,
    private _name: string,
    private _email: Email,
    private _password: Password,
    private _role: Role,
    public readonly createdAt: Date
  ) {}

  static create(props: {
    name: string;
    email: string;
    password: string;
    role?: Role;
  }): User {
    const email = Email.create(props.email);
    const password = Password.create(props.password);

    return new User(
      crypto.randomUUID(),
      props.name,
      email,
      password,
      props.role || Role.defaultRole(),
      new Date()
    );
  }

  get name(): string { return this._name; }
  get email(): Email { return this._email; }
  get role(): Role { return this._role; }

  updateName(name: string): void {
    if (!name || name.length < 1) throw new Error('Name cannot be empty');
    this._name = name;
  }

  updateEmail(email: string): void {
    this._email = Email.create(email);
  }

  changeRole(newRole: Role): void {
    this._role = newRole;
  }

  verifyPassword(plainPassword: string): boolean {
    return this._password.verify(plainPassword);
  }
}
Codex CLIでの効果的なパターン適用プロンプト
パターン検出プロンプト
プロジェクトのコードベースを分析して、以下のデザインパターン適用機会を特定してください:

1. switch文が3つ以上のケースを持つ箇所 → Strategy パターン候補
2. 同じインターフェースで異なる実装が必要な箇所 → Factory パターン候補
3. 横断的関心事(ログ、キャッシュ、認証)→ Decorator パターン候補
4. オブジェクト構築が5つ以上のパラメータを持つ → Builder パターン候補
5. コールバックチェーンや状態変化の通知 → Observer パターン候補

各候補について、現在のコード、推奨パターン、改善後のコードを提示してください。
リファクタリングプロンプト
このファイルをStrategy パターンを使ってリファクタリングしてください。
条件:
- 既存のテストが壊れないようにする
- インターフェースを先に定義してから実装クラスを作る
- 移行は段階的に行い、旧コードとの互換性を維持する
Codex CLIのプロンプトエンジニアリングで、効果的なプロンプトの書き方を詳しく解説しています。
SES現場でのデザインパターン活用事例
事例1:決済システムのリファクタリング
あるSES案件では、5つの決済手段(クレジットカード、コンビニ、銀行振込、電子マネー、QRコード決済)への対応が必要でした。
Before: 巨大なif-else文で決済処理を分岐
After: Codex CLIでStrategy + Factory パターンを適用
- 新しい決済手段の追加が「クラス1つ追加 + ファクトリー登録」だけで完了
- テストが各決済戦略ごとに独立して書けるようになった
- コードのカバレッジが45%→87%に向上
事例2:マルチテナントSaaS
Decoratorパターンでテナントごとの機能差分を表現し、Observerパターンでテナント間イベント連携を実装した事例です。
// テナント固有機能のデコレータ
const service = new TenantAuditDecorator(
  new TenantCacheDecorator(
    new BaseUserService(repository),
    tenantCache
  ),
  auditLogger
);
Codex CLIでのレガシーコードリファクタリングも参考にしてください。
テスト戦略:パターン適用後のテスト
デザインパターンを適用したコードは、テストが書きやすくなるのがメリットです。
describe('NotificationService (Strategy)', () => {
  it('should send email notification', async () => {
    const mockEmailStrategy = {
      send: vi.fn().mockResolvedValue(undefined),
      validate: vi.fn().mockReturnValue(true),
    };

    const service = new NotificationService();
    service.register('email', mockEmailStrategy);

    await service.notify('email', '[email protected]', 'Hello');

    expect(mockEmailStrategy.send).toHaveBeenCalledWith(
      '[email protected]', 'Hello', undefined
    );
  });

  it('should throw for invalid recipient', async () => {
    const mockStrategy = {
      send: vi.fn(),
      validate: vi.fn().mockReturnValue(false),
    };

    const service = new NotificationService();
    service.register('email', mockStrategy);

    await expect(
      service.notify('email', 'invalid', 'Hello')
    ).rejects.toThrow('Invalid recipient');
  });
});
Codex CLIのテスト自動化で、テスト生成の詳細を解説しています。
まとめ:Codex CLIでデザインパターンを実務に落とし込む
デザインパターンは「知識」だけでは価値がありません。実務のコードに適用してこそ意味があるのです。
- Factory: 複数のデータソースやサービスの切り替えを柔軟に
- Strategy: if-else地獄からの解放、新しい戦略の追加が容易に
- Decorator: ログ・キャッシュ・認証を透過的に追加
- Observer: イベント駆動アーキテクチャの基盤
- Builder: 複雑なオブジェクト構築を読みやすく
- Command: Undo/Redo、操作履歴の実装
Codex CLIを使えば、パターンの選択から実装、テストまでを一貫してAIに支援させることができます。SES現場で「設計力のあるエンジニア」として差をつけましょう。
OpenAI Codex CLIシリーズの他の記事も読む
👉 Codex CLI入門ガイド 👉 Codex CLI レガシーコードリファクタリング 👉 Codex CLI プロンプトエンジニアリング 👉 SES BASEで案件を探す