- Claude CodeでAWSリソースの構築からデプロイまでを対話的に自動化できる
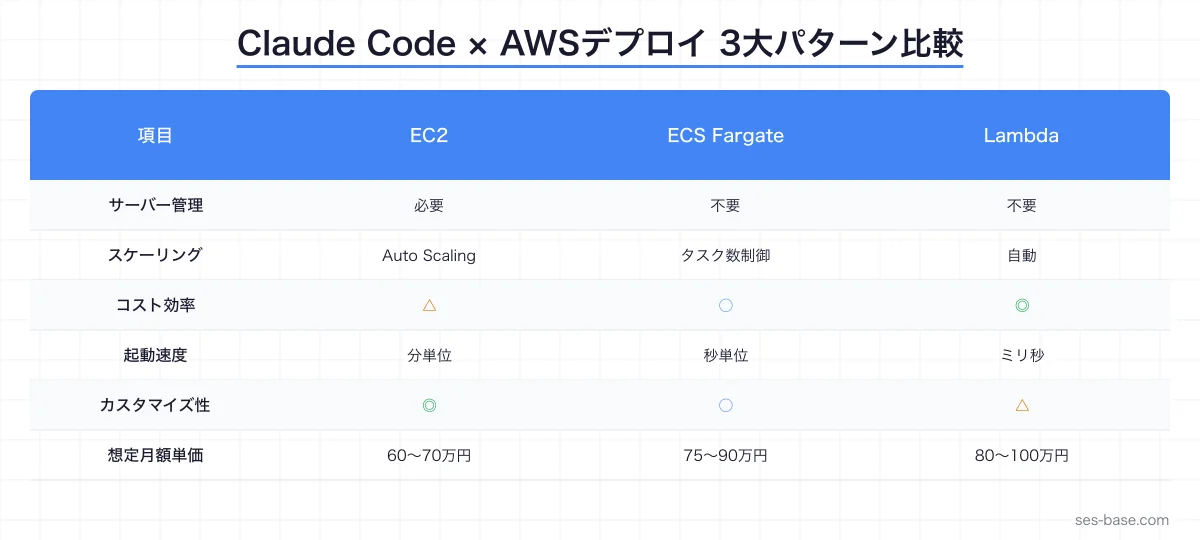
- EC2・ECS Fargate・Lambda の3大デプロイ先に対応した実践ワークフローを紹介
- IaCテンプレート自動生成とCI/CDパイプライン構築でSES現場の生産性を大幅に向上
「AWSへのデプロイ設定が複雑すぎて、毎回ドキュメントを見直している…」「CloudFormationやTerraformのテンプレートを手書きするのが面倒…」——こうした悩みを抱えるSESエンジニアは多いのではないでしょうか。
結論から言うと、Claude Codeを活用すれば、AWSインフラの構築からアプリケーションデプロイまでの作業を対話的に自動化できます。EC2へのSSHデプロイ、ECS Fargateでのコンテナデプロイ、Lambda関数のサーバーレスデプロイなど、現場で頻出するパターンをカバーできます。
この記事はClaude Code完全攻略シリーズとして、AWSデプロイ自動化の実践手法を解説します。
- Claude CodeでAWSデプロイを自動化するメリットと基本アプローチ
- EC2・ECS Fargate・Lambdaそれぞれのデプロイワークフロー
- CloudFormation/Terraformテンプレートの自動生成手法
- CI/CDパイプラインとの統合パターン
- SES現場での活用事例と単価アップへの活かし方
Claude Code × AWSデプロイ自動化の全体像
なぜClaude CodeでAWSデプロイなのか
AWSへのデプロイ作業には多くのステップが含まれます。
- インフラリソースの定義(VPC、サブネット、セキュリティグループ)
- アプリケーションのビルドとパッケージング
- デプロイ設定の作成(タスク定義、起動テンプレートなど)
- デプロイの実行と検証
- ロールバック手順の準備
これらをClaude Codeに任せることで、手作業によるミスを減らし、デプロイ速度を大幅に向上できます。
基本的なアプローチ
Claude CodeでAWSデプロイを自動化する際の基本フローは次の通りです。
1. プロジェクト構成の分析
   ↓
2. デプロイ先の選定(EC2/ECS/Lambda)
   ↓
3. IaCテンプレートの自動生成
   ↓
4. CI/CDパイプラインの構築
   ↓
5. デプロイの実行と検証
CLAUDE.mdでのAWSデプロイ設定
プロジェクトルートのCLAUDE.mdにAWS関連の情報を記載しておくと、Claude Codeのデプロイ精度が向上します。
# AWS デプロイ設定
- リージョン: ap-northeast-1 (東京)
- アカウントID: 123456789012
- デプロイ環境: dev / staging / production
- IaCツール: Terraform (v1.8+)
- コンテナレジストリ: ECR
- CI/CD: GitHub Actions

# 命名規則
- リソース名: {project}-{env}-{resource}
- タグ: Environment, Project, ManagedByCLAUDE.mdの詳しい書き方は「CLAUDE.md書き方完全ガイド」を参照してください。
EC2へのデプロイ自動化
EC2デプロイの基本パターン
EC2は最も柔軟なデプロイ先です。既存のオンプレミス環境からの移行や、特定のOS・ミドルウェアが必要な場合に選択されます。
Claude Codeに以下のように指示します。
このNode.jsアプリケーションをEC2にデプロイするための
インフラ構成を作成してください。
要件:
- Amazon Linux 2023
- t3.medium インスタンス
- ALB経由のHTTPS接続
- Auto Scaling(最小2台、最大6台)
- RDSとの接続(プライベートサブネット)
Terraformテンプレートの自動生成
Claude Codeは、上記の要件から自動的にTerraformテンプレートを生成します。
# main.tf
module "vpc" {
  source  = "terraform-aws-modules/vpc/aws"
  version = "~> 5.0"

  name = "${var.project}-${var.environment}-vpc"
  cidr = "10.0.0.0/16"

  azs             = ["ap-northeast-1a", "ap-northeast-1c"]
  private_subnets = ["10.0.1.0/24", "10.0.2.0/24"]
  public_subnets  = ["10.0.101.0/24", "10.0.102.0/24"]

  enable_nat_gateway = true
  single_nat_gateway = true

  tags = local.common_tags
}

resource "aws_launch_template" "app" {
  name_prefix   = "${var.project}-${var.environment}"
  image_id      = data.aws_ami.amazon_linux_2023.id
  instance_type = "t3.medium"

  vpc_security_group_ids = [aws_security_group.app.id]

  user_data = base64encode(templatefile("${path.module}/user-data.sh", {
    app_name    = var.project
    environment = var.environment
  }))

  tag_specifications {
    resource_type = "instance"
    tags = merge(local.common_tags, {
      Name = "${var.project}-${var.environment}-app"
    })
  }
}

resource "aws_autoscaling_group" "app" {
  name                = "${var.project}-${var.environment}-asg"
  vpc_zone_identifier = module.vpc.private_subnets
  target_group_arns   = [aws_lb_target_group.app.arn]
  health_check_type   = "ELB"

  min_size         = 2
  max_size         = 6
  desired_capacity = 2

  launch_template {
    id      = aws_launch_template.app.id
    version = "$Latest"
  }
}
デプロイスクリプトの生成
Claude Codeにデプロイスクリプトの生成を依頼することもできます。
#!/bin/bash
# deploy-ec2.sh - Claude Codeが生成したデプロイスクリプト
set -euo pipefail

APP_NAME="myapp"
ENV="${1:-staging}"
REGION="ap-northeast-1"

echo "🚀 Deploying $APP_NAME to $ENV..."

# アプリケーションのビルド
npm ci --production
npm run build

# S3にアーティファクトをアップロード
ARTIFACT="$APP_NAME-$(git rev-parse --short HEAD).tar.gz"
tar czf "$ARTIFACT" dist/ node_modules/ package.json
aws s3 cp "$ARTIFACT" "s3://${APP_NAME}-artifacts/${ENV}/${ARTIFACT}"

# CodeDeployでデプロイ
aws deploy create-deployment \
  --application-name "$APP_NAME" \
  --deployment-group-name "${APP_NAME}-${ENV}" \
  --s3-location "bucket=${APP_NAME}-artifacts,key=${ENV}/${ARTIFACT},bundleType=tgz" \
  --region "$REGION"

echo "✅ Deployment initiated successfully"
ECS Fargateへのコンテナデプロイ
なぜECS Fargateが選ばれるのか
SES現場ではコンテナ化されたアプリケーションのデプロイが急増しています。ECS Fargateならサーバー管理不要でコンテナを実行でき、運用コストを大幅に削減できます。
Dockerfileの最適化
Claude Codeにコンテナ化を依頼すると、マルチステージビルドを活用した最適化されたDockerfileを生成してくれます。
# ビルドステージ
FROM node:20-alpine AS builder
WORKDIR /app
COPY package*.json ./
RUN npm ci
COPY . .
RUN npm run build

# 本番ステージ
FROM node:20-alpine AS runner
WORKDIR /app
RUN addgroup --system --gid 1001 nodejs
RUN adduser --system --uid 1001 appuser

COPY --from=builder /app/dist ./dist
COPY --from=builder /app/node_modules ./node_modules
COPY --from=builder /app/package.json ./

USER appuser
EXPOSE 3000
HEALTHCHECK --interval=30s --timeout=3s --start-period=5s \
  CMD wget --no-verbose --tries=1 --spider http://localhost:3000/health || exit 1

CMD ["node", "dist/server.js"]
ECSタスク定義の自動生成
{
  "family": "myapp-production",
  "networkMode": "awsvpc",
  "requiresCompatibilities": ["FARGATE"],
  "cpu": "512",
  "memory": "1024",
  "executionRoleArn": "arn:aws:iam::role/ecsTaskExecutionRole",
  "taskRoleArn": "arn:aws:iam::role/ecsTaskRole",
  "containerDefinitions": [
    {
      "name": "app",
      "image": "123456789012.dkr.ecr.ap-northeast-1.amazonaws.com/myapp:latest",
      "portMappings": [
        {
          "containerPort": 3000,
          "protocol": "tcp"
        }
      ],
      "healthCheck": {
        "command": ["CMD-SHELL", "wget -q --spider http://localhost:3000/health || exit 1"],
        "interval": 30,
        "timeout": 5,
        "retries": 3,
        "startPeriod": 60
      },
      "logConfiguration": {
        "logDriver": "awslogs",
        "options": {
          "awslogs-group": "/ecs/myapp-production",
          "awslogs-region": "ap-northeast-1",
          "awslogs-stream-prefix": "app"
        }
      },
      "secrets": [
        {
          "name": "DATABASE_URL",
          "valueFrom": "arn:aws:secretsmanager:ap-northeast-1::secret:myapp/production/db-url"
        }
      ]
    }
  ]
}
Blue/Greenデプロイの実装
Claude Codeに「Blue/Greenデプロイを実装して」と指示すると、CodeDeployを使った安全なデプロイ設定を生成します。
resource "aws_codedeploy_deployment_group" "app" {
  app_name               = aws_codedeploy_app.app.name
  deployment_group_name  = "${var.project}-${var.environment}"
  deployment_config_name = "CodeDeployDefault.ECSAllAtOnce"
  service_role_arn       = aws_iam_role.codedeploy.arn

  auto_rollback_configuration {
    enabled = true
    events  = ["DEPLOYMENT_FAILURE"]
  }

  blue_green_deployment_config {
    deployment_ready_option {
      action_on_timeout = "CONTINUE_DEPLOYMENT"
    }

    terminate_blue_instances_on_deployment_success {
      action                           = "TERMINATE"
      termination_wait_time_in_minutes = 5
    }
  }

  deployment_style {
    deployment_option = "WITH_TRAFFIC_CONTROL"
    deployment_type   = "BLUE_GREEN"
  }

  ecs_service {
    cluster_name = aws_ecs_cluster.main.name
    service_name = aws_ecs_service.app.name
  }

  load_balancer_info {
    target_group_pair_info {
      prod_traffic_route {
        listener_arns = [aws_lb_listener.app_https.arn]
      }

      target_group {
        name = aws_lb_target_group.blue.name
      }

      target_group {
        name = aws_lb_target_group.green.name
      }
    }
  }
}
Lambda関数のサーバーレスデプロイ
Lambdaデプロイの基本
サーバーレスアーキテクチャは、SES現場でのマイクロサービス開発で頻繁に採用されています。Claude Codeを使えば、Lambda関数の作成からAPI Gatewayとの連携まで一気通貫で設定できます。
API GatewayとLambdaでRESTful APIを構築してください。
要件:
- TypeScript (ESM)
- API Gateway HTTP API
- Lambda Powertools for logging/tracing
- DynamoDBとの連携
- SAMテンプレートで管理
SAMテンプレートの自動生成
AWSTemplateFormatVersion: '2010-09-09'
Transform: AWS::Serverless-2016-10-31
Description: MyApp Serverless API

Globals:
  Function:
    Timeout: 30
    MemorySize: 256
    Runtime: nodejs20.x
    Architectures:
      - arm64
    Environment:
      Variables:
        TABLE_NAME: !Ref DynamoDBTable
        LOG_LEVEL: INFO
    Tracing: Active

Resources:
  ApiGateway:
    Type: AWS::Serverless::HttpApi
    Properties:
      StageName: !Ref Environment
      CorsConfiguration:
        AllowOrigins:
          - "https://myapp.example.com"
        AllowMethods:
          - GET
          - POST
          - PUT
          - DELETE
        AllowHeaders:
          - Content-Type
          - Authorization

  GetItemFunction:
    Type: AWS::Serverless::Function
    Properties:
      CodeUri: functions/get-item/
      Handler: index.handler
      Events:
        Api:
          Type: HttpApi
          Properties:
            ApiId: !Ref ApiGateway
            Path: /items/{id}
            Method: GET
      Policies:
        - DynamoDBReadPolicy:
            TableName: !Ref DynamoDBTable
    Metadata:
      BuildMethod: esbuild
      BuildProperties:
        Minify: true
        Target: es2022
        EntryPoints:
          - index.ts

  DynamoDBTable:
    Type: AWS::DynamoDB::Table
    Properties:
      TableName: !Sub "${AWS::StackName}-items"
      BillingMode: PAY_PER_REQUEST
      AttributeDefinitions:
        - AttributeName: id
          AttributeType: S
      KeySchema:
        - AttributeName: id
          KeyType: HASH
Lambda関数のコード生成
Claude Codeは、Lambda Powertoolsを活用した本番品質のコードを生成します。
// functions/get-item/index.ts
import { APIGatewayProxyHandlerV2 } from 'aws-lambda';
import { Logger } from '@aws-lambda-powertools/logger';
import { Tracer } from '@aws-lambda-powertools/tracer';
import { DynamoDBClient } from '@aws-sdk/client-dynamodb';
import { DynamoDBDocumentClient, GetCommand } from '@aws-sdk/lib-dynamodb';

const logger = new Logger({ serviceName: 'get-item' });
const tracer = new Tracer({ serviceName: 'get-item' });

const client = tracer.captureAWSv3Client(new DynamoDBClient({}));
const docClient = DynamoDBDocumentClient.from(client);

export const handler: APIGatewayProxyHandlerV2 = async (event) => {
  const id = event.pathParameters?.id;

  if (!id) {
    return {
      statusCode: 400,
      body: JSON.stringify({ error: 'Missing item ID' }),
    };
  }

  logger.info('Getting item', { id });

  try {
    const result = await docClient.send(
      new GetCommand({
        TableName: process.env.TABLE_NAME!,
        Key: { id },
      })
    );

    if (!result.Item) {
      return {
        statusCode: 404,
        body: JSON.stringify({ error: 'Item not found' }),
      };
    }

    return {
      statusCode: 200,
      body: JSON.stringify(result.Item),
    };
  } catch (error) {
    logger.error('Failed to get item', { error });
    return {
      statusCode: 500,
      body: JSON.stringify({ error: 'Internal server error' }),
    };
  }
};
CI/CDパイプラインとの統合
GitHub Actionsワークフローの自動生成
Claude Codeに「GitHub ActionsでAWSデプロイのCI/CDを構築して」と依頼すると、OIDC認証を使った安全なワークフローを生成します。
name: Deploy to AWS
on:
  push:
    branches: [main]
  pull_request:
    branches: [main]

permissions:
  id-token: write
  contents: read

jobs:
  test:
    runs-on: ubuntu-latest
    steps:
      - uses: actions/checkout@v4
      - uses: actions/setup-node@v4
        with:
          node-version: 20
          cache: npm
      - run: npm ci
      - run: npm test
      - run: npm run lint

  deploy-staging:
    needs: test
    if: github.ref == 'refs/heads/main'
    runs-on: ubuntu-latest
    environment: staging
    steps:
      - uses: actions/checkout@v4

      - name: Configure AWS Credentials
        uses: aws-actions/configure-aws-credentials@v4
        with:
          role-to-assume: ${{ secrets.AWS_ROLE_ARN_STAGING }}
          aws-region: ap-northeast-1

      - name: Login to ECR
        id: ecr-login
        uses: aws-actions/amazon-ecr-login@v2

      - name: Build and push image
        env:
          REGISTRY: ${{ steps.ecr-login.outputs.registry }}
          IMAGE_TAG: ${{ github.sha }}
        run: |
          docker build -t $REGISTRY/myapp:$IMAGE_TAG .
          docker push $REGISTRY/myapp:$IMAGE_TAG

      - name: Deploy to ECS
        uses: aws-actions/amazon-ecs-deploy-task-definition@v2
        with:
          task-definition: task-definition-staging.json
          service: myapp-staging
          cluster: myapp-staging
          wait-for-service-stability: true

  deploy-production:
    needs: deploy-staging
    runs-on: ubuntu-latest
    environment: production
    steps:
      - uses: actions/checkout@v4

      - name: Configure AWS Credentials
        uses: aws-actions/configure-aws-credentials@v4
        with:
          role-to-assume: ${{ secrets.AWS_ROLE_ARN_PRODUCTION }}
          aws-region: ap-northeast-1

      - name: Deploy to ECS (Blue/Green)
        run: |
          aws ecs update-service \
            --cluster myapp-production \
            --service myapp-production \
            --task-definition myapp-production \
            --force-new-deployment
OIDC認証の設定
Claude Codeに依頼すれば、GitHub ActionsとAWSのOIDC認証設定も自動生成できます。
# OIDC Provider
resource "aws_iam_openid_connect_provider" "github" {
  url             = "https://token.actions.githubusercontent.com"
  client_id_list  = ["sts.amazonaws.com"]
  thumbprint_list = ["6938fd4d98bab03faadb97b34396831e3780aea1"]
}

# IAMロール
resource "aws_iam_role" "github_actions" {
  name = "${var.project}-github-actions-${var.environment}"

  assume_role_policy = jsonencode({
    Version = "2012-10-17"
    Statement = [
      {
        Effect = "Allow"
        Principal = {
          Federated = aws_iam_openid_connect_provider.github.arn
        }
        Action = "sts:AssumeRoleWithWebIdentity"
        Condition = {
          StringEquals = {
            "token.actions.githubusercontent.com:aud" = "sts.amazonaws.com"
          }
          StringLike = {
            "token.actions.githubusercontent.com:sub" = "repo:${var.github_org}/${var.github_repo}:*"
          }
        }
      }
    ]
  })
}
環境ごとの設定管理
マルチ環境デプロイの設計
Claude Codeに「dev/staging/productionの3環境でデプロイを管理して」と指示すると、Terraformのworkspace機能やディレクトリ分離を活用した構成を提案します。
infrastructure/
├── modules/
│   ├── networking/
│   ├── compute/
│   ├── database/
│   └── monitoring/
├── environments/
│   ├── dev/
│   │   ├── main.tf
│   │   ├── variables.tf
│   │   └── terraform.tfvars
│   ├── staging/
│   │   ├── main.tf
│   │   ├── variables.tf
│   │   └── terraform.tfvars
│   └── production/
│       ├── main.tf
│       ├── variables.tf
│       └── terraform.tfvars
└── shared/
    └── backend.tf
シークレット管理の自動化
デプロイに必要なシークレットの管理もClaude Codeで自動化できます。
resource "aws_secretsmanager_secret" "app_secrets" {
  name = "${var.project}/${var.environment}/app-config"

  tags = merge(local.common_tags, {
    Component = "secrets"
  })
}

resource "aws_secretsmanager_secret_version" "app_secrets" {
  secret_id = aws_secretsmanager_secret.app_secrets.id
  secret_string = jsonencode({
    DATABASE_URL   = var.database_url
    API_KEY        = var.api_key
    JWT_SECRET     = var.jwt_secret
  })
}シークレット管理の詳細は「AWS Secrets Manager活用ガイド」を参照してください。
デプロイの監視とロールバック
ヘルスチェックの自動設定
Claude Codeにデプロイ後の監視設定を依頼すると、CloudWatchアラームとSNS通知を組み合わせた監視体制を構築します。
resource "aws_cloudwatch_metric_alarm" "high_error_rate" {
  alarm_name          = "${var.project}-${var.environment}-high-error-rate"
  comparison_operator = "GreaterThanThreshold"
  evaluation_periods  = 2
  metric_name         = "5XXError"
  namespace           = "AWS/ApplicationELB"
  period              = 300
  statistic           = "Sum"
  threshold           = 10

  dimensions = {
    LoadBalancer = aws_lb.app.arn_suffix
  }

  alarm_actions = [aws_sns_topic.alerts.arn]

  tags = local.common_tags
}

resource "aws_cloudwatch_metric_alarm" "high_latency" {
  alarm_name          = "${var.project}-${var.environment}-high-latency"
  comparison_operator = "GreaterThanThreshold"
  evaluation_periods  = 3
  metric_name         = "TargetResponseTime"
  namespace           = "AWS/ApplicationELB"
  period              = 300
  statistic           = "p99"
  threshold           = 3

  dimensions = {
    LoadBalancer = aws_lb.app.arn_suffix
  }

  alarm_actions = [aws_sns_topic.alerts.arn]
}
自動ロールバックの実装
デプロイ失敗時の自動ロールバック設定もClaude Codeで生成できます。
#!/bin/bash
# rollback.sh
set -euo pipefail

CLUSTER="myapp-production"
SERVICE="myapp-production"
REGION="ap-northeast-1"

# 前のタスク定義を取得
CURRENT_TASK=$(aws ecs describe-services \
  --cluster "$CLUSTER" \
  --services "$SERVICE" \
  --region "$REGION" \
  --query 'services[0].taskDefinition' \
  --output text)

CURRENT_REVISION=$(echo "$CURRENT_TASK" | grep -oP ':\K\d+$')
PREVIOUS_REVISION=$((CURRENT_REVISION - 1))
FAMILY=$(echo "$CURRENT_TASK" | sed 's/:[0-9]*$//')

echo "🔄 Rolling back from revision $CURRENT_REVISION to $PREVIOUS_REVISION"

aws ecs update-service \
  --cluster "$CLUSTER" \
  --service "$SERVICE" \
  --task-definition "${FAMILY}:${PREVIOUS_REVISION}" \
  --region "$REGION"

echo "✅ Rollback initiated. Monitoring service stability..."

aws ecs wait services-stable \
  --cluster "$CLUSTER" \
  --services "$SERVICE" \
  --region "$REGION"

echo "✅ Service is stable after rollback"
SES現場での活用パターン
パターン1:既存オンプレミスからの移行
多くのSES案件では、オンプレミス環境からAWSへの移行プロジェクトが発生します。Claude Codeを使えば、以下のワークフローで効率的に移行できます。
- 現状分析:既存のインフラ構成をClaude Codeで分析
- 移行計画:AWSサービスへのマッピングを自動提案
- IaC生成:Terraformテンプレートを自動生成
- テスト環境構築:ステージング環境を迅速に構築
- 切り替え:Blue/Greenデプロイで安全に移行
パターン2:マイクロサービスのデプロイ自動化
このモノリスアプリケーションを3つのマイクロサービスに分割し、
それぞれECS Fargateにデプロイする構成を作成してください。
サービス間通信はAPI Gateway + Service Discoveryを使用。
Claude Codeは、サービスメッシュの構成からCI/CDパイプラインまで一貫した設計を提案します。
マイクロサービスアーキテクチャの詳細は「Claude Code × マイクロサービス開発ガイド」を参照してください。
パターン3:コスト最適化を含むデプロイ
月額コストを30%削減しながら同等のパフォーマンスを維持する
インフラ構成を提案してください。
現在:EC2 m5.xlarge × 4台(常時稼働)
Claude Codeは、Auto Scaling、Reserved Instances、Gravitonプロセッサの活用など、コスト最適化を考慮したデプロイ構成を提案します。
コスト最適化の詳細は「Claude Codeコスト最適化ガイド」を参照してください。
AWSデプロイにおけるセキュリティベストプラクティス
最小権限の原則
Claude Codeでデプロイ設定を生成する際は、最小権限の原則に基づいたIAMポリシーを要求しましょう。
デプロイに必要な最小限のIAMポリシーを作成してください。
過剰な権限(AdministratorAccessなど)は使用しないこと。
セキュリティスキャンの統合
CI/CDパイプラインにセキュリティスキャンを組み込むことも、Claude Codeで自動化できます。
- name: Run Trivy vulnerability scanner
  uses: aquasecurity/trivy-action@master
  with:
    image-ref: ${{ env.REGISTRY }}/myapp:${{ github.sha }}
    format: 'sarif'
    output: 'trivy-results.sarif'
    severity: 'CRITICAL,HIGH'

- name: Upload Trivy scan results
  uses: github/codeql-action/upload-sarif@v3
  with:
sarif_file: 'trivy-results.sarif'セキュリティ対策の詳細は「Claude Codeセキュリティ対策ガイド」を参照してください。
SES案件での単価アップに直結するスキル
AWSデプロイ自動化のスキルは、SES市場で高い評価を受けます。
| スキルレベル | 想定月額単価 | 求められるスキル |
|---|---|---|
| 基本 | 60〜70万円 | EC2へのデプロイ、基本的なCloudFormation |
| 中級 | 75〜90万円 | ECS/Fargate、Terraform、CI/CD構築 |
| 上級 | 90〜110万円 | マルチ環境管理、Blue/Green、IaC設計 |
| エキスパート | 110万円〜 | マイクロサービス基盤設計、FinOps |
Claude Codeを活用してこれらのスキルを効率的に習得し、上位案件への参画を目指しましょう。
まとめ:Claude CodeでAWSデプロイを革新する
この記事のポイントをまとめます。
- Claude CodeはAWSインフラの構築からデプロイまでを対話的に自動化できる
- EC2・ECS Fargate・Lambdaの3大デプロイパターンをカバー
- IaCテンプレートの自動生成でCloudFormation/Terraform作成の工数を大幅削減
- CI/CDパイプライン構築もGitHub Actions連携で自動化可能
- Blue/Greenデプロイや自動ロールバックで安全なデプロイを実現
- SES現場でのAWSデプロイ自動化スキルは月額単価90〜110万円クラスの案件に直結
Claude Codeを使いこなすことで、複雑なAWSデプロイ作業を効率化し、エンジニアとしての市場価値を高めましょう。
SES BASEでAWSデプロイ案件を探す
Claude Code・AWS・IaCの経験を活かせるSES案件をSES BASEで検索してみてください。